


A guide to making your very own Sourdough Starter and a free printable schedule!
 I can count on one hand the number of times I’ve attempted to bake yeast breads and I can also say that I’ve been unsuccessful for the same number of times. Because I can usually rely on my cake baking skills, I was compelled to learn something new and conquer my fear of bread-baking-failure once and for all. After years of avoiding learning to bake yeast breads, I finally gathered the courage to begin the journey of bread-baking and not stop until achieving a successful loaf.
My bread of choice – Sourdough. It has to be one of my favorite breads of all time. The crust, the tang, I love it on its own or used as sandwich bread.
The source of yeast for Sourdough comes from what’s called a Starter. The Starter is a combination of flour and water that gets “fed” with an equal amount of flour and water over a period of time to continuously provide fuel for the yeast present. During this period of time, the “wild” yeast and bacteria present in the starter ferments and forms acidic by-products, which eventually gives Sourdough its characteristic sour flavor.
 I did not use the traditional starter components of flour and water. Instead, I used the Jump Starter recipe I found in the Spring 2016 issue of Sift magazine, which contains some yeast and sugar. I presume it’s called a jump starter because the added yeast and sugar allows the starter to be ready in a quick amount of time (8-12 hours instead of at least 3 days), but I actually fed it a few times before trying my first loaf.
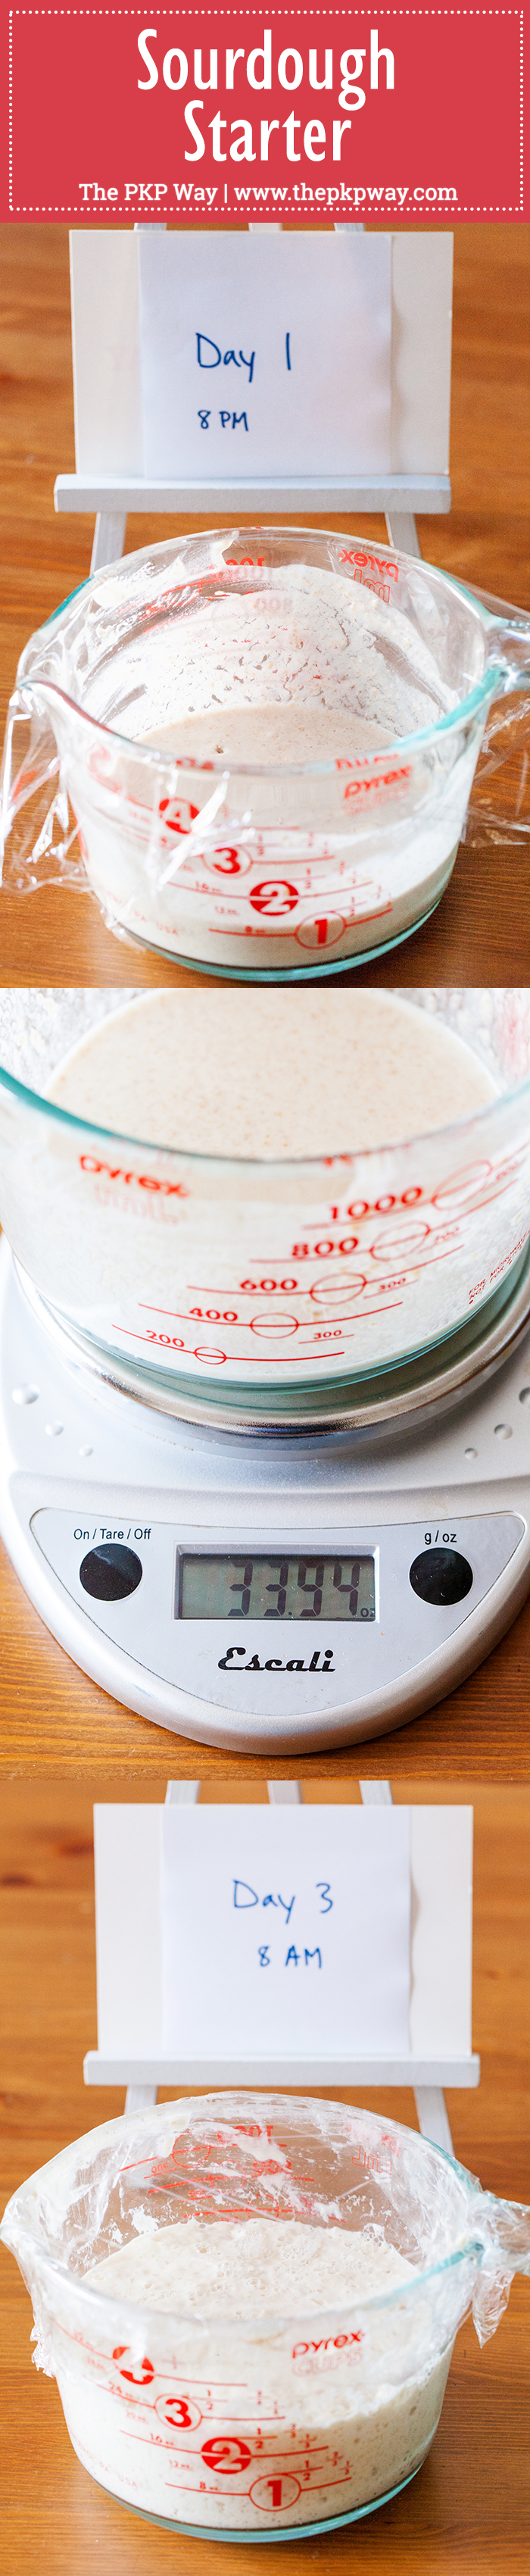
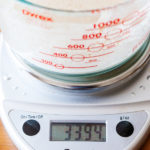
I began by weighing a glass measuring cup. The feeding process involves discarding all but 4 ounces of starter each time. By weighing the cup first, I simply needed to discard until I reached 4 ounces above the starting weight. Make sense?
 Next, I combined the jump starter ingredients and noted the time because each feeding should take place 12 hours apart and I wanted to be as consistent as possible. I loosely covered the cup with plastic wrap and left it to sit in the oven (not on!) over night.
My first feeding took place on Day 2 in the morning, 12 hours after combining the ingredients. You can see that some liquid formed in the bottom layer, which is ok. Just stir it back in. Then, remove all but 4 ounces (I saved the discard to use later in a recipe, but you can also throw it away or give it to someone to make their own starter). Because I knew the weight of my measuring cup (29.94 ounces), I just needed to discard until I reached 4 ounces above my measuring cup (33.94 ounces). Then, to feed my starter, I added 4 ounces of flour and 4 ounces of water. I stirred until combined, replaced the plastic wrap, and returned to the oven for another 12 hours.
 The second feeding took place in the evening, on the same day as the first, 12 hours after the first feeding. Same thing as the first feeding, discard all but 4 ounces and stir in 4 ounces of flour and 4 ounces of water.
Repeat for the third feeding, which took place on Day 3 in the morning. Except this time, I reserved the discard to attempt my first loaf of Sourdough. Test the starter to see if it’s ready by dropping a teaspoon of starter into water. If it floats, it’s ready. If it’s not, continue the feeding schedule until it floats.
 Maintaining your Starter
At this point, you can feed the starter again if you’re going to use it within 24 hours. If not, simply maintain by storing it in the refrigerator and feeding it the same way once a week. Maintaining allows you to have fresh starter at the ready! Before making Sourdough again, just remove it from the refrigerator and feed it about 2-3 times before using it in your Sourdough (yes, that means you have to plan ahead).
Don’t want to Make your own Starter?
Alternatively, if you don’t want to begin your own starter, you can order one that’s already pre-made, but you still have to feed it. There are also powdered sourdough starters available, which lets you avoid feeding altogether, but you still have to prepare it 24-72 hours ahead of time.
Phew! That was a lot of info. I’ll leave you at that so you can decide how you’d like to proceed with your starter (it’s really satisfying to make it from scratch though).
If you opt to make your own Starter, I created a printable for you to help you stay on track with the feeding schedule. Simply click on the link below and print it out. Fill in the weight of the container and the time you made the starter. I also included space for you to fill in what you’d like to use your discard starter for (optional). Once you’ve completed each step, simply check it off under the “Completed” column so you don’t lose track of your starter’s feeding schedule.
{{Click here for the FREE Printable Sourdough Starter Schedule}}
See you later in the week where I’ll share my Sourdough journey ;)
Sourdough Starter
Ingredients
- ¼ teaspoon instant yeast
- ¾ cup (6 ounces) water
- 1 teaspoon honey or sugar
- ¼ cup ( 1 ⅛ ounces) whole wheat flour
- ½ cup (2 ⅛ ounces) unbleached all-purpose flour
To Feed
- 3-5 cups of unbleached all-purpose flour
- 1 ½ - 2 ½ cups water
Instructions
- In a glass bowl or measuring cup, combine all the ingredients. Cover loosely with plastic wrap and store at room temperature.
- Every 12 hours, discard all but 4 ounces and feed by stirring in 1 cup (4 ounces) of unbleached all-purpose flour and ½ cup (4 ounces) of water. Cover loosely with plastic wrap and store at room temperature.
- The starter is ready to be used when about 1 teaspoon of starter floats in a glass of water (after 2-3 feedings). If it doesn’t float, continue with 1-2 feedings.
Notes
Adapted from Sift, Spring 2016
This page contains affiliate links that help make The PKP Way possible.
I can’t wait to make this, nut in second to last paragraph you stated still in one cup of flour, 4 0z. One cup would be 8 oz. So do we stir in 1/2 cup or 1 cup?
Hi Dianemar, let me clarify. 1 cup of flour weighs approximately 4 ounces. If you’re using a scale, measure out 4 ounces. If you’re not using a scale, measure out 1 cup in a dry measuring cup. Hope that helps!
Thanks for the printable starter schedule. It’s a lot nicer to look at, compared to my messy notes.
I’m so glad you found it helpful! Happy baking :)